

How To Make A Melon Farm In Minecraft
This is a tutorial on how to farm pumpkins and melons, both manually and automatically. For other types of farming see Farming.
Contents
- ane Growth mechanics
- 1.1 Finding Seeds
- i.2 Growth Factors
- 2 Manual farms
- 2.1 Simple farms
- 2.ii Large farms
- 2.iii Multi-level farms
- two.4 Rapid-harvest farms
- 3 Semi automatic farms
- three.1 Basic design
- 3.2 Stackable design
- three.2.i Base Layer
- iii.2.ii Piston and Farm Layers
- three.2.3 Cap and Water Layers
- four Fully automatic farms
- 5 The Most Effective Pumpkin/Melon farm
- 5.ane Opaque block detection farms
- v.1.1 Single constitute detection
- 5.i.2 Dropper hopper trigger
- 5.1.iii Dual-piston growth detection
- 5.2 BUD excursion farm
- 5.ii.i Design 6 (doesn't work in bedrock edition)
- 5.3 Vertical observer farms
- 5.3.1 Design 7
- 5.3.2 Design eight
- 5.iv Horizontal observer farm
- 5.4.i Design nine
- v.4.two Blueprint 10 - stackable horizontal piston observer melon/pumpkin subcontract
- 5.five Time-based farm
- 5.5.1 Design eleven - High-density pumpkin and melon farm
- 5.ane Opaque block detection farms
Growth mechanics [ ]
Melons and pumpkins utilise essentially the same mechanics for growth and can exist easily farmed with the same techniques. One time the plants are mature, they provide a steady supply of fruit for your needs. Surprisingly, water is non needed to grow pumpkins or melons. When planted, they create a stalk that starts out short, only grows and becomes yellow as information technology matures. Only mature stalks tin can grow pumpkins and melons.
Finding Seeds [ ]
To begin farming, seeds must showtime exist found. You tin can either find seeds in chests or notice whole melons or pumpkins and craft them into seeds.
- Pumpkins can be found growing "wild" in any biome with grass[note 1] or in taiga villages.
- Melons can be found growing "wild" in jungles[annotation two] or in savanna villages.
- Pumpkin and melon seeds tin can both be institute in minecarts with chests inside mineshafts, and in chests in dungeons.
If you do have a whole pumpkin or melon, but no seeds, simply identify the pumpkin in a crafting grid, which yields 4 seeds, or, alternatively, place the pumpkin somewhere and utilize shears on it. The melon drops melon slices when mined, yielding 1 seed each when putting in a crafting area.
Notation: Pre-1.13 players must put the whole pumpkin in a crafting area and craft it into 4 seeds.
Growth Factors [ ]
The growth rate of melon and pumpkin stems and the spawning of melon and pumpkin fruit is determined by the same growth rate algorithm equally for wheat, carrots, and potatoes. The stem itself has viii phases of growth until maturity. Os meal may be used to accelerate growth.
The attempt to grow a fruit happens when the mature stem would grow once more (to "stage 9") and is not already next to an instance of its fruit. Outset one of the four sides is chosen. If this space is suitable (empty with dirt, grass, podzol, farmland, or coarse clay beneath) the fruit is created. Bone meal does not forcefulness fruit production.
- Thus, hydrated farmland adjacent increases growth rates of stems and production rate of fruit, having the aforementioned stalk blazon adjacent to the stem (unless in rows) reduces growth rates and fruit production, light level 9 in the block to a higher place the stem is required for whatsoever growth, etc.
- The maximum probability of fruit production from a single stem would, therefore, require a stem in hydrated farmland with hydrated farmland on all eight sides, with four of those farmland blocks remaining unplanted (the corners may be planted with some other ingather). Practical farms often accept reduced per-establish product rates (⅔, ⅓, or even ⅙ of the maximum) for greater infinite efficiency and ease of harvest.
Both sorts of fruit revert farmland below them to dirt when they grow. Pumpkins can about easily be harvested with an axe, and drop whole as items. Melons can be broken quickest using an axe. They as well break faster using a sword merely at the price of double durability. While melons abound as blocks, the melons are broken into 3–7 slices by harvesting (unless a Silk Touch tool is used). In both cases, the harvested fruit can be crafted back into seeds. Harvesting mature stems too produces seeds (1–four per stem), but information technology is faster to wait for the already-mature stalk to grow a fruit than to regrow a mature stalk from seed.
- ↑ Each chunk has a 1/32 gamble of attempting to spawn pumpkins when the chunk is generated; a random point is chosen and 64 attempts are made to discover a random air cake with grass beneath in a 15×15×7 region around the point in which to identify a pumpkin. Note the random point could exist far in the air or far underground, greatly reducing the chances of pumpkins being able to exist placed.
- ↑ For each jungle chunk generated a random signal is chosen and 64 attempts are fabricated to find a random replaceable cake (e.g. air, long grass, or vines) with grass beneath in a 15×fifteen×7 region effectually the point in which to place a melon. Note the random signal could be far in the air or far underground, profoundly reducing the chances of melons being able to exist placed.
Manual farms [ ]
This section contains suitable layouts for farms that must be manually harvested. The percentages given are space efficiencies. Parenthesized values are theoretical maximums, which assume that there are free blocks surrounding the farm for the border plants to identify melons. The maximum possible efficiency for any melon or pumpkin farm is 50% (one fruit per stem). Spaces, where fruit can occupy two or more than stems, reduce the efficiency and yield. Question-mark blocks betoken that anything could be put in that spot—perhaps lighting, or other crops such as wheat, carrots, or potatoes. You may want to cover the h2o with a slab, a lily pad, or a carpet.
Simple farms [ ]
The following grids provide unlike availabilities for designs of pumpkin and melon farms.
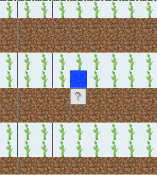
If you just want a quick, compact farm, use blueprint D beneath. C and D have slightly lower efficiency, merely both fit on a "standard subcontract plot", and are easy to harvest. Of those two, D probable has a faster growth rate due to the separated rows of stalks, but the centre row should non be open dirt/grass or farmland (or more stalks), because any fruit spawned there tin can tie up two stems. For C, the center row can be anything except more than stalks, for the same reason.
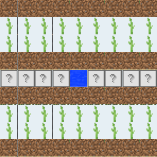
Design A is slightly larger and maximizes infinite efficiency. It tin be tiled for larger farms, but alternating rows should exist mirrored top-to-lesser to keep the efficiency. Design B is least efficient but fits in a slightly smaller plot.
 Subcontract Plan A, 9×10, 48.88%. | 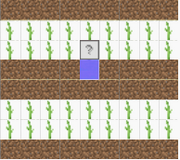 Farm Plan B, 9×8, 43.21%. |
 Farm Programme C, ix×9, 44.44%. |  Farm Plan D, 9×9, 44.44%. |
Large farms [ ]
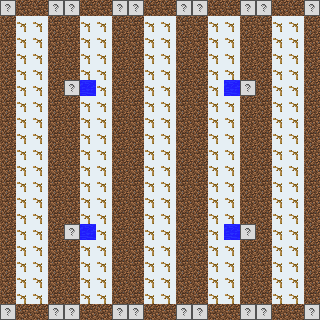
Nearly of the to a higher place farms can be tiled to make larger farms, though in some cases, alternate rows or columns of the plots should exist flipped for best results. This subcontract represents an expansion of design A (turned sideways), with the left column of plots reversed (it also shows the farmland border for the whole subcontract). The basic plots could be repeated further, expanding the farm in units of 9×9. Note that this blueprint aims to make sure that each fruit occupies only 1 stem — as information technology increases in size, the efficiency approaches 49%.
Multi-level farms [ ]
While the above designs all use one layer, the most efficient (49.38%) ix×9 subcontract can be created by using two layers. Blueprint is based on design D, and cobblestone indicates spaces that are covered (with clay) by the layer above.
When replicated over a larger area, blueprint Thou has spots where you need to jump. Pattern H avoids that but keeps the same efficiency. For design H, the water source must exist placed with care so that it won't spread into the "corridors". However, if at that place is the usual pit in the bottom layer (and matching pigsty above), the source cake tin can be placed against ane of the upper blocks, or 2 blocks above that layer. The position of the melon stems and dirt/grass/farmland blocks in the ii farming layers can be swapped without losing efficiency.
 Farm Plan M bottom layer, 9×9, 29.62% (44.44%). | 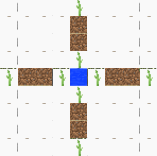 Subcontract Programme G upper layer, 9×9. |
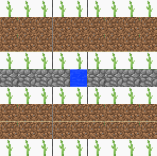 Farm Plan H bottom layer, 9×9, 29.62% (44.44%). | 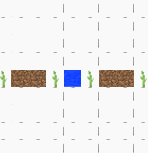 Farm Plan H pinnacle layer, 9×9. |

An case of the Plan D elementary farm.

An instance of automatic farm.
Rapid-harvest farms [ ]
The above layouts are optimized for high spacial efficiency, at the cost of speed. They piece of work best for infrequent harvests, with enough of fourth dimension for the field to regrow in between. For frequent harvests, the commencement post-obit layout may be better suited; if harvested once per day-and-night cycle, it yields almost 17 fruits per harvest (as opposed to nearly 13 fruits for the higher up designs). The second layout goes fifty-fifty further in that direction—it does not utilise space efficiently but instead gives each stem ii–four potential places to spawn a pumpkin or melon, encouraging quicker initial growth at the price of a clumsier pattern and reduced long-term yield.
 Rapid-harvest Farm 1. |  Rapid-Harvest Farm 2. |
Semi automated farms [ ]
Both melons and pumpkins are broken and dropped when a piston pushes into them. This mechanic can be used to create self harvesting farms. The simplests designs like this push gluey pistons upward into the fruit. Since information technology is hard to automatically collect the items when harvested this fashion, the technique makes for some practical semi automatic designs.
| Design tutorial i (view on YouTube) |
|---|
| Design tutorial 2 (view on YouTube) |
|---|
| Design tutorial iii (view on YouTube) |
|---|
Basic pattern [ ]
This design uses pasty pistons to button the block the pumpkin or melon is sitting on upward. To salvage redstone, it is possible to waterlog slabs so that the redstone line can be underneath the water without beingness washed out.
Stackable design [ ]
The following design sacrifices space efficiency in order to fully automate harvesting and allow massive expansion: The tower can be expanded upwardly to the build limit and/or downwards to bedrock, potentially yielding nearly a k growing spaces per tower.
The total area of the subcontract is thirteen blocks by 7 blocks, with an alternating piston and farm layers. Its height is ii blocks, plus 2 more for each "crop layer" of viii growing spaces. You lot need the following materials to make it:
- xvi dirt
- 8 jack-o-lanterns, or glowstone (for lighting)
- viii iron
- 28 Redstone + an extra ten - 13
- At least 50 generic blocks per crop layer, an extra 43 blocks for the build as a whole.
The farmland is hydrated past h2o flowing down from above. A pressure plate at the end of the collection area on the bottom activates a Redstone torch tower, which in plough activates each piston layer. The harvest falls down the empty middle area into flowing water at the lesser layer and is channeled to the actor continuing on the pressure plate.
Starting tips:
- To speed upward drove, place ice blocks nether the watercourse.
- The farm can be lit from inside by glowstone as shown, or much more cheaply by jack o'lanterns. Unfortunately, you can't place a jack-o-lantern directly onto a piston, so if you demand to put temporary blocks in place of the pistons, put the jack-o-lanterns on top of those, and then supersede the temporary blocks with the pistons.
- The pressure plate can be replaced with a hopper or two, leading to a chest or two south of information technology. So, the Redstone can be triggered with a switch anywhere along its length. Yet, a sufficiently tall farm may produce enough goods to overwhelm the hopper (750 items—call it a dozen stacks—have five minutes to absorb, so additional stacks may expire. Twenty or so levels of melons could do that, or most of a hundred levels of pumpkins).
See the following steps to build the farm itself:
- Start with the base layer, which is a modified farm layer. The farmland squares should be planted with your seeds, while the dirt is where pumpkins or melons grow.
- If you are using jack o'lanterns for light, think the temporary blocks every bit noted higher up.
- Place a piston layer on tiptop of that. This completes your first crop layer, and for the bare-minimum "tower", you lot could get on to the cap and h2o layers from hither. More likely, proceed to:
- Alternate farm and piston layers, as many as you want. Each pair is a crop layer. This is the expandable section, and you are limited only by resource.
- After the last piston layer, build the cap layer instead of another farm layer. The blackness wool indicates temporary blocks (whatever solid, non-falling cake) that you remove after placing the h2o on the tiptop level.
- Last of all, build the top layer, place the water, and mine out those temporary blocks. For the top-near layer, all the h2o blocks are sources (the Art of the Bucket can assistance in filling them speedily).
Schematics:
[Schematic Assistance]
Base Layer
Piston and Subcontract Layers
Cap and Water Layers
Fully automatic farms [ ]
These farms require no player interaction for the harvesting and collection of pumpkins or melons after existence congenital. Fully automatic farms require pistons and redstone to function and are generally more than expensive to build than manual or semi-automatic pumpkin and melon farms.
Farms are triggered automatically in 1 of three means.
- By a system based on time. You tin can use either a Redstone/hopper clock or a daylight sensor for this.
- By making bud switches, or placing observers, that detect when an adjacent cake updates.
- Using a simple Redstone circuit that completes when a pumpkin or melon grows.
Pumpkins and melons are collected in a combination of the following.
- Water streams
- Hoppers
- Hopper minecarts.
The Well-nigh Effective Pumpkin/Melon subcontract [ ]
This farm requires a observer straight above a establish and pistons that actuate when the establish moves. These outputs are and so taken through a hopper minecart into a chest. This is cheap simply harder to build due to the orientations of the pistons and and observers. This is a brusk video explaining the topic. https://www.youtube.com/spotter?v=AcX-M7-HyKQ
Opaque block detection farms [ ]
These farms transport redstone power through the space where a pumpkin or melon can grow. When the block there is opaque, redstone power tin pass to side by side component, triggering a piston to harvest the pumpkin or melon.
These designs fabricated obsolete by the observer. Observer based melon and pumpkin farms are generally easier to make, more than meaty, and, in some cases, more than efficient.
Single plant detection [ ]
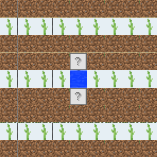
This design requires just ane piston per pumpkin stem and doesn't crave a bud switch. This pumpkin farm fits within a 5x5 area and is relatively unproblematic to build.
Clock designs are superior to this every bit they allow for improve command over the harvesting. Information technology is possible for the ii rightmost plants to grow long before the first one does, so more frequent harvesting is desirable.
| YouTube Video (view on YouTube) |
|---|
Dropper hopper trigger [ ]
This melon/pumpkin farm is modular and uses a dropper/hopper philharmonic to discover melon growth. The dropper should contain an item to be dispensed into the hopper, triggering the piston.
Schematic layers
Elevation view layer three - Dropper contains 1 item.
| YouTube Video (view on YouTube) |
|---|
Dual-piston growth detection [ ]
Simplified harvesting unit of measurement, side view
This design powers a gluey piston whenever a pumpkin or melon has grown. The sticky piston is used to power a regular piston and break the produce.
This pattern is tileable and stackable, which could be useful if y'all desire a larger farm. When tileing, the rightmost column can be rotated around the air cavalcade behind the lower piston to relieve space.
When stacking, you may want to run a hopper line beside the redstone repeaters to the bottom so everything tin can be nerveless at a central location. Information technology may likewise exist possible to remove hoppers from the upper layers and allow the produce to fall downwardly to the bottom.
The schematic shows half of tileable part of 4-growing-space floor plan. The other half is a n-to-due south mirrored copy of the outset half, sharing the central slice of hoppers and chests to keep atomic number 26 cost depression (7 hoppers per four growing spaces). Each growing space has 2 stems beside it. At that place are 2 rows of farmland between growing spaces, then each stem in the middle has 5 wet farmlands nearby, resulting in better growth charge per unit than if the stalk has less than four moisture farmlands effectually. The leftmost and rightmost side of the farm should also take 2 rows of iii farmlands to have the same stalk growth rate. Not all of melon slices are nerveless by the hoppers, but the amount nerveless is probably skilful enough.
The second flooring is a left-to-right mirror image of first floor, and so the upper hopper of the outset floor pulls items from the large chest of second floor.
Stacked mirrored variation
Top mirrored view, layer i
Top mirrored view, layer 2
Pinnacle mirrored view, layer 3
As shown by the schematics below, the pattern tin can be varied for early game before slimeballs have been obtained for viscid pistons. It instead uses 2 regular pistons and two sands per growing space. Yet, the peak is 6 blocks, 2 times taller than the original blueprint.
Design without viscous pistons
BUD circuit farm [ ]
Design half-dozen (doesn't work in boulder edition) [ ]
This farm is small, has no glutinous pistons, and is resource friendly. It uses a BUD switch to decide if a pumpkin/melon has matured then activates a piston to break information technology and ship information technology into a hopper.
Vertical observer farms [ ]
An observer on top of a melon/pumpkin growing block, looking down, can be used to discover a melon/pumpkin growing.
The observer besides detects the piston arm and the other cake moved by the piston to harvest a pumpkin or melon and may cause the piston to extend and retract in a loop if in that location is no mechanism to forbid it.
An observer on height of the stem inhibits growth, and so it cannot be used in this position.
Blueprint seven [ ]
This design is lag-friendly and uses the observer block to detect grown pumpkins (or melons). It's compact and cheap to build and can be easily expanded.
This blueprint uses a gluey piston to push the observer downward to harvest a pumpkin or melon. The piston does not receive power from the management it faces, then another route is needed to transmit the signal. A slime block is placed betwixt the observer and piston to help extract the observer's signal. The signal is passed through a 2-tick redstone repeater that extends it plenty for the sticky piston to pull the slime cake and observer dorsum to their original position.
Blueprint eight [ ]
This farm packs high yield per growing infinite in a small tile area per growing space (2x2, excluding edge and water). All mechanical and circuitry components are above basis and stem level, so the ground can devote to maximize growth rate. Its stacking height is 6 blocks. This pattern might exist bad because the crops aren't picked up by the hopper when they fall on the full dirt blocks.
Forepart view - growing infinite slices
Front view - betwixt growing space slices
Top view layer 1 - hoppers
Top view layer two - farmland, dirt, and h2o
Top view layer 3 - pumpkin stems, melon stems and potatoes
Top view layer 4 - observers looking down, unmovable jack-o'-lanterns
Tiptop view layer 5 - slime and redstone circuit (repeaters and dust), repeaters set to ii redstone ticks
Top view layer half-dozen - sticky pistons confront downwardly
For high output per growing space, found four stems (2 pumpkin stems and two melon stems) next to the growing space, and surround each stem'south root with 6 wet farmlands, then its growth rate is the maximum value (1/3 per random block tick) (ane/12 for each available space adjacent to stem). Growing spaces surrounded past 4 such stems have the highest possible output rate per growing space. Potatoes are planted to prevent pumpkin or melon growing on farmland where they they are not wanted. The edge of farm surrounding the outer stems should have potatoes on wet farmland as well if at that place is available infinite. A water cake is placed in every 8x8 surface area. Stems around the water block in the middle of the subcontract has 5 wet farmland around them, and then their growth charge per unit is slightly reduced to 1/4 per random block tick (1/16 for each available space adjacent to the stalk). When the farm is extended in the schematic'southward e-west direction, sharing the leftmost and rightmost redstone dust on the stationary block, 1 pumpkin or melon fruit growing trigger eight pistons at the same fourth dimension.
Horizontal observer farm [ ]
The observer can exist used to detect melon/pumpkin growing, or detect the change in the stem when information technology bears fruit.
Blueprint 9 [ ]
This farm uses observer horizontally, it needs a larger area than vertical observer farm. Place 2 stems on farmlands with ane air block between the stems. The stems can be melon, pumpkin, or both. Below the empty air block, identify any type of cake that a melon/pumpkin can abound on, and behind that space place an observer block. Accept the observer be wired upward to a regular piston pointing toward the air block and on pinnacle of it. Finally, have a hopper beneath it that collects the melons and put it into a breast. This method, all the same, loops continuously in one case set up off, as the observer sees the piston arm and triggers repeatedly unless there is a machinery to stop the signal.
Side view - redstone wire piece
Design ten - stackable horizontal piston observer melon/pumpkin farm [ ]
In this example, the observer measures the stem instead of the fruit. This makes the farm more compact since there is no demand for a mechanism that stops the machine from continuously looping in one case set off, as the observer sees the piston arm and triggers repeatedly. The farm produces 12-13 melons per infinitesimal.
Time-based farm [ ]
Pattern xi - High-density pumpkin and melon subcontract [ ]
This farm has a high yield per volume. And it takes little resource per growing infinite when yous expand the farm.
The flooring consists of farmlands and dirt in the checkerboard pattern. There are hoppers under farmlands and they are continued to a storage container(s). 1 cake of dirt is replaced with water in every 9х9 area. Pumpkin seeds and melon seeds are planted in alternating rows, so their diagonal stem neighbors are of a different kind from themselves. On dirt, blocks are air blocks and on these air blocks are pistons facing down. On the same level as pistons, jack-o'lanterns are placed over stems and farmlands cavalcade. The pistons and jack-o'lanterns are in a checkerboard pattern. Redstone pulses from clock are sent to one opaque block on piston, then spread through redstone repeaters and redstone dusts, which are on jack-o'lanterns, and more opaque blocks on pistons. Appropriate clock cycle period may be around 5-6 seconds or longer.
Top view layer i - hoppers
Top view layer ii - farmland, dirt, and water
Height view layer 3 - pumpkin stems and melon stems
Top view layer four - pistons and jack-o'-lanterns
Elevation view layer v - redstone circuit
This farm's stacking acme is 5 blocks. The 2nd flooring does non demand another clock. It can accept signal from redstone torch column and pass information technology through pulse limiter in the corner like the first floor. Items from the second floor can exist sent downward through starting time flooring's water with Minecart with Hopper or breast in the water and Dropper in the Redstone circuit layer with hoppers betwixt them.

Source: https://minecraft.fandom.com/wiki/Tutorials/Pumpkin_and_melon_farming
Posted by: langstonsuchang.blogspot.com
0 Response to "How To Make A Melon Farm In Minecraft"
Post a Comment